Sunday, 17 August 2014

I heart pattern testing: Boo! Designs Firefly Dress - Mummy's Choice


I'm excited to share another Firefly Dress I made during pattern testing. Just quietly this one is my favourite Firefly... it might just be my favourite dress EVER! 

My beautiful little girl is ever so slightly in love with pink. When we walk into the fabric store I will ask "what kind of fabric should we buy today?" and without fail her answer is ALWAYS "I want pink please mummy". I, however, am not a big fan of pink... I don't hate it but I really love blues and greys. They are the colours that I gravitate towards. So despite miss pink's wishes I wanted to make a Firefly out of the colours I love. 


I made the dress and was planning to buy some blue buttons to coordinate until the clever ladies in the testing group suggested contrast coloured buttons. So I set about making my own buttons. That was the beginning of a new obsession. Since then I have made all of the buttons I have used! It adds such a lovely personal touch to a garment. I will be blogging about how you can make your own buttons too in the near future :)


I am so glad I went with the contrasting buttons. 


Can anyone say photo overload?? I have a hard time choosing which shots I like the most and which ones to exclude. I love them all for different reasons.

This one below really captures the dress and our trip to the waterfront. Eloise was not still for even one second. She was running and jumping and spotting seagulls and boats and JUMPING! This dress photographs so well. Those ruffles, the big bow, the full skirt! (can you tell I'm a fan??)


I made a simple bow with the blue fabric and one of the buttons on it then I attached it to a hair clip and clipped it above her hair tie.


Looking at little crabs hiding in their holes in the sand.


 Look at the little pops of pink from the buttons against the pretty features of the dress.


So what do you think? I am VERY happy with how this dress turned out. And... despite the lack of pink, Eloise loved it. When she saw it she said "Oh, wow!" What little girl wouldn't love a Firefly Dress?

As I mentioned in my first Firefly Dress post this is a fabulous pattern and I recommend it for those wanting to make a dress with "wow factor".

If you haven't grabbed your copy of One Thimble yet you can purchase it here (affiliate link) or click on the link over there --->

I will be sharing two more Firefly Dresses very soon. The next one will be my "pimped" version. Kristie asked for one Firefly according to the pattern and then a "pimped" one, one where we were free to use our creative instinct and mix up the pattern. The other testers are such a talented bunch and their "pimped Fireflies" are AH-MAY-ZING!!! Keep an eye out over at Boo! Designs Pattern Club for more to pop up.

As always feel free to leave a comment here or on FB to let me know what you think, or with a link to your Firefly Dress. I love seeing how other people interpret patterns :)

Kerry xx

Thursday, 14 August 2014

I heart pattern testing: Cloud 9 tank from Petit Threads


A few weeks ago I was lucky enough to test the Cloud 9 tank from Petit Threads (A collaboration between Celina from Petit a Petit and Laura from Titchy Threads). This tank will be paired with coordinating swim shorts and released as part of a swimwear collection.

This is a super quick and simple sew. It can be made with swimwear fabric or jersey cotton. I made three all with jersey cotton fabric. Xander's is a size 9, Sethan's is a size 6 and Eloise is in a size 2.

The pattern is well drafted, it lines up perfectly and the instructions are straightforward to follow. It is a beginner level pattern and would suit someone who is new to sewing with knits. These take about 15mins to make (probably less after the first one).

The fit was great and the kids loved wearing them despite it being winter when we took the photos.

First up is miss E... twirling and jumping. I made a modified twirly skirt for her to wear with her tank and embroidered overlapping hearts on the front.


Then my middle sized monkey. Seth is always excited to wear things his mummy has made him.
He's getting so big!


Then my biggest little man. By far and away the best at cooperating for photos :)

 And then my attempts to get three children to stand together for photos... Always good in theory but Eloise never stands still at the beach :)


Love these three little monkeys to the moon :)

When the pattern is released I will try to pop back and put up a link. It is a great wardrobe basic that can be as simple or as interesting as your imagination allows.

Once the weather warms up I'll be whipping up a few more of these.

Thanks for stopping by.

Don't forget about the release of One Thimble tomorrow... I'm hoping to buy my copy after the school run :) 

Kerry xx


Saturday, 2 August 2014

I heart pattern testing: Boo! Designs Firefly Dress - Ka-chow!


Imagine my excitement when I got an email asking me to join the testing team for the Boo! Designs Firefly Dress!! This is such an awesome pattern. Today I am sharing my FIRST version, the "Ka-Chow Dress" as Eloise has named it.

 A week or so after testing began we had a car themed party to attend so I decided my first version would be a dress for Eloise to wear to that. She is, incidentally, a big fan of the movie "Cars" and instantly recognised this dress as a Lightening McQueen "Ka-Chow" dress.


So... about the pattern...
It was designed by Kristie from Boo! Designs so, as expected, it is professionally drafted. There's not a lot of printing and taping involved (yay!) but what I did print and tape matched up with precision. It all lined up perfectly when sewing too which is vital for a good finished product. The end result was a dress that turned out exactly as it was supposed to.

This is a detailed pattern aimed at intermediate sewists. The main pressure points are the mitred neckline and the bodice/ruffle construction. Kristie's instructions are fabulous as usual and I didn't have any unpicking adventures while getting it made. The raw edges are all enclosed so this dress is beautiful on the outside and comfortable on the inside.


 I decided to use a drill fabric for the main parts of the dress because I couldn't resist this chequered flag print. I matched it with a plain red cotton and a printed yellow cotton for the contrast parts and plain red buttons. I made the majority of this first one in one night (after the kids went to bed) but finished off the neckline and buttons the next day. 


I love it, and more importantly, so does Eloise :)


 I'm impressed at how girly this dress can be in florals and pinks and then really edgy and trendy in more modern fabrics. Wait 'til you see all the pimped versions in the coming weeks too!


 Look at the big red bow at the back!! And the pops of red from the buttons. The whole back opens up which is FABULOUS for miss E who HATES pulling things on over her head...really hates it! It is great for not messing up pretty hairstyles too (not an issue for us, we are pretty simple when it comes to hairstyle).


 I love this side view of the ruffles...


It's got good coverage under the arms too.


So WHERE and WHEN can I buy this I hear you ask??
Over on the right ---> there should be a link for One Thimble. 
Or: Click here to visit One Thimble. (affiliate link). This pattern will be available in the next edition of One Thimble. It will be released in just under two weeks (Aug 15). I will be buying a copy for all the other patterns and tutorials in it too (there are going to be some awesome things, I can't wait).

I'd love to hear what you think of my version so please leave a message here or on our facebook page. I have made two more of these beautiful dresses with quite different "looks" and I'll be popping back to blog about them very soon. I'm hoping to get time to make even more. Keep an eye out for the other  testers' versions popping up on facebook and blogland.

I received  a copy of this pattern as a part of the testing but my opinions are always my own :)

Kerry xx

Saturday, 26 July 2014

All The Little Things


I try to sew as often as possible, most often late at night once the kids are in bed. But I am better at sewing than I am at blogging. So this is a bit of a catch up for some of the things I've made over the past few months but not shared here. Sorry,but some of these are dodgy mobile phone photos.
 The first photo is from March. I made this Little Missy Bolero with some Lisette fabric for Eloise to wear with this GORGEOUS ribbon trimmed tutu I bought from a very clever, crafty friend and owner of CharliQ Tutus. It is so professionally made with lovely soft tulle and glossy ribbon. I can't recommend them highly enough.

Below is a pair of Leon shorts that I made into suspender shorts with a few small modifications. This reminds me I need to make some more Leon shorts. How cute are they?


I wanted to make a suspender skirt and started with the Pattern Emporium Flat Front Skirt. In the end I changed every piece except for the pocket lining piece. That is not because there is anything wrong with the pattern (in fact it's a great pattern for a simple skirt and makes a good jumping off point for individual creativity) but to get the look I was after I made the changes :)


The shorts above are Clover Shorts from Willow&Co paired with another Little Missy Bolero. I love both of these patterns. I will be making more of these when the weather warms back up.
The shorts below are another version of the Clover Shorts. These have the ruffle top which gives a paper bag shorts look.


Below is a little blanket I crocheted for Eloise's dolls bed. I made the squares for it a looooong time ago but finally stitched them all together.


One of the many Boo! twirly skirts I have made recently. This one has tiny strawberries on it and I bound the hem with contrast binding.


I made a modified Hummingbird dress from Rabbit Rabbit. It is a little shorter than the pattern (I was using stash fabric and didn't have enough for the suggested length) and the flutters are from the Boo! Designs DYO overalls pattern. I love the end result.


Below is the Louisa Dress from Compagnie-M. It is fully lined and the turquoise is corduroy so it is nice and warm. (and a little sneak peek at some buttons I made...more on that in a later post)


Thanks for visiting. Some exciting things are coming up....

I have been testing two fabulous patterns and can't wait to share some pics of them. I will be blogging about how to make your own buttons. Oh, and we are having a little giveaway on our facebook page to show our appreciation to you for following our little blog.

and... I forgot to mention... I passed all of my Fellowship exams!! No more exams for me for a really long time!

Please leave a message here or on our FB page to let me know what you think. Please feel free to link up pics of your projects too. I've enjoyed seeing some pics of Twirly Pettiskirts popping up :)

Kerry xx

Sunday, 13 July 2014

Twirly Pettiskirt Tutorial


This is a super quick post to share an idea I had. I have been wanting a pettiskirt for E to wear when taking  photos of her dresses. The idea to use the Boo! DYO Twirly Skirt pattern as a jumping off point has been sitting in my mind for so long. Recently I decided to just do it.

So, this is a tutorial on how to modify the twirly skirt pattern to make a cute pettiskirt.  I love the Twirly Skirt pattern and have made so many of them for miss E.

I have a confession to make... I have, once or twice put two or three twirly skirts on E under a dress to give it the right amount of fullness... but now I don't have to :)


I suggest using a light fabric like lawn for this, though I'm sure it would work just as well with other fabrics. I used lawn for the bottom tier, but I was stash busting, so I didn't have enough. I used up some white quilting cotton for the upper two tiers.

I used the size 2 "Twirly Skirt With Contrast" measurements. I used the exact measurements for the waistband and skirt parts, but I cut two lots of the skirt part (ie four pieces). Then for the bottom ruffles I cut three pieces half the length of the contrast hem measurement and the full width of fabric (44" in my case). For larger sized skirts this will have to be wider, I would suggest at least double the width of the middle skirt so it gathers nicely.
The reason for it being half the length is because I didn't double it over. 

So:
Waistband Piece x2 (as per pattern)
Skirt piece x4 (two x the pattern)
extra long contrast pieces (four separate lots each about double the total width suggested but half the length)


So, now I had cut enough for one waist band, two skirts pieces and four extra wide contrast pieces. Then I sewed my bottom tier pieces together. I finished the bottoms of each of these with a rolled hem on my overlocker. Then (also using my overlocker) I gathered the top edges of each of them and pinned two to each of the skirt pieces' bottom edge and sewed them on. I made the middle skirt  piece as per the instructions (twice) and attached them to the waist band and finished the skirt as a normal twirly skirt. 

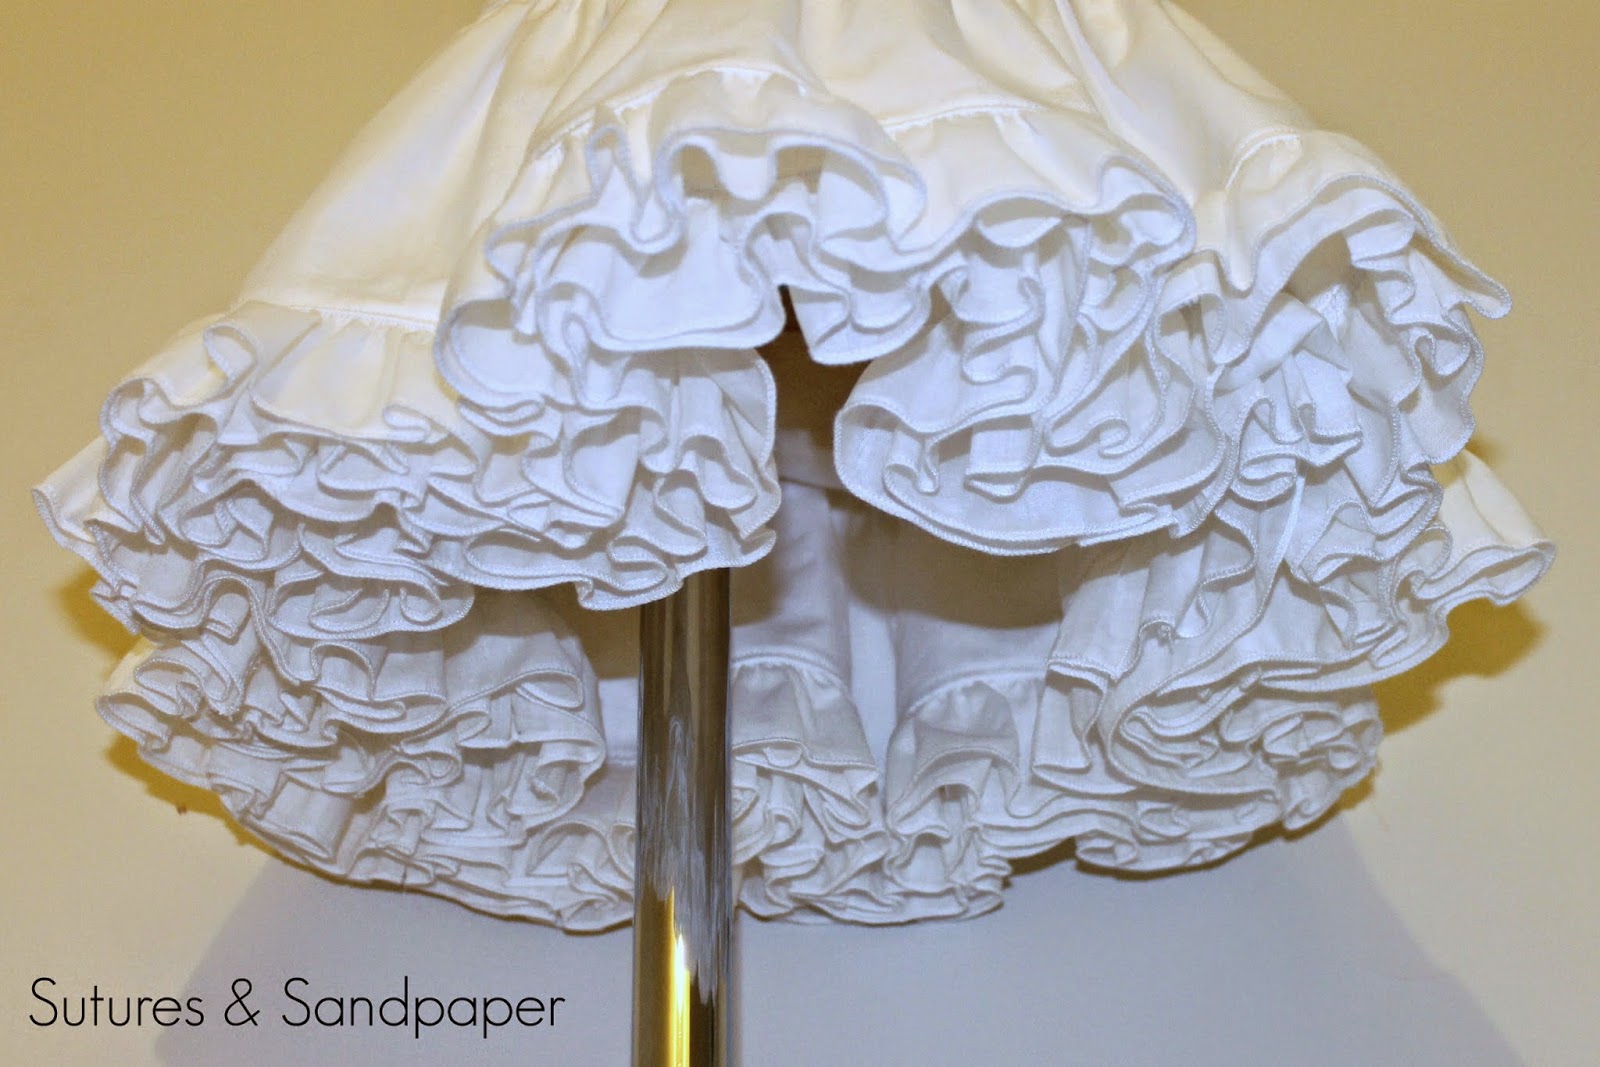
Here is a pic of a modified Hummingbird dress without, and then with the pettiskirt under it to show the difference it makes.


...and one more super ruffly pic because they look cool :)


For even more fullness you could add another middle skirt piece with two ruffle bottom pieces to it.

I have been working on some very cool pattern testing recently that I can't wait to share with you when the testing is complete. You will NOT want to miss it! 


In the meantime, I'll pop back with a post of all the little things I've made recently but not had time to write a post about.


Please let me know what you think :)


Kerry xx

---------------------------------------------------------------------

Little add on... I decided to make a pink pettiskirt using the same technique. The only difference is that I split the waistband part to use an extra colour. I used Lawn for all of this one and chose four shades of pink. I wanted it to get lighter as is went down and then darker again towards the inner layer.

And here are some photos :)


look at the coloured ruffles :) It turned out just like the picture in my head.


I just love how twirly skirts can lay out flat as a circle!


And... more ruffle shots. This bottom one makes me smile :)
It looks like a flower to me.


Thanks for visiting our blog.

Please feel free to leave a message or link to pics of your pettiskirts :)

Kerry xx


Saturday, 5 July 2014

Scalloped Princess Dress LKC Blog Tour and Givaway


What a fun blog tour. I've been so excited waiting to share my contribution. Lydia from Little Kiwi's Closet has designed this adorable dress pattern so every little girl can be a princess. Look at the line up on the tour :)


This pattern has loads of options. Four neckline options, two bodice options, three skirt length options and three hem styles!! By my calculations that's about 72 different dresses in one pattern. And it comes in sizes 12mo to 9yo. 

I asked Eloise which princess she wanted to be, and showed her lots of princess photos for inspiration. She was quite adamant "pink princess mummy". So pink princess is what she got. 


I opted for the scalloped skirt and the princess bodice and rounded neckline. I added in silver bias binding. I then drafted up the poufy parts for the sides... I know they probably have a fancy name but I can't think of it. 

To make the "poufy parts" I used silvery mesh fabric and cut two large circles (I traced around a pool ring). Then I folded them in half and gathered the curved edge with my overlocker. I then attached them between the skirt and the bodice outer before top stitching them in place. 

Eloise is wearing a pettiskirt I made under the dress which gives it a little more fullness. (I might post some pics of the pettiskirt in the next few days).


I love the look of the silver bias but unfortunately it is a bit scratchy, plus, it's winter and quite cold at the moment so we opted for a long sleeved white top underneath. 


I sent Mr Sutures to the shops to get a tiara and wand and I think he did a pretty good job. He even got little clip on earrings which completed the look. 


I didn't have to ask E twice to get all dressed up in this outfit. 


I found this pattern easy to follow and the end result was exactly what I hoped it would be. I think the beauty of this pattern is the many, many options. You can make a fairy tale princess dress with it, but also a regular, wear everyday dress. You can grab your copy of the pattern here. And, don't forget to go to Little Kiwi's Closet to check out the other great dresses on the tour.

Please enter the giveaway below for your chance to win.

Feel free to leave a message to let me know what you think :)

Kerry xx

a Rafflecopter giveaway